Download
Popular Posts
-
Gibboni and the Gibbon: At Stereo Exchange’s annual Spring High-End Audio Show, Roger Gibboni (left) of Rogers High Fidelity debu...
-
Hey, we were in earthquake country, the land from which Carole King may have received inspiration to write, "I Feel the Earth Move...
-
A reader once noted that I tend to stick with the same reference gear longer than most reviewers. In addition to Audience's Au24e i...
-
John Atkinson and Stephen Mejias were unable to attend the Munich High End Show this year, so the call went out to the editors of Ste...
-
Today, Sony announced an end to production on all MiniDisc players. In a few years, MiniDisc production will cease as well. I know w...
-
The name sounds perfect . It fits neatly next to those of Messrs. Leak, Sugden, Walker , Grant, Lumley, and others of Britain's...
-
The Enigmacoustics company from Irvine in California has become renowned for the self-energized, horn-loaded Sopranino electrostatic su...
-
With the introduction of Audio Alchemy's Digital Transmission Interface (DTI) more than three years ago, the company created an ent...
-
If it's rare to go to an audio show and hear most of a company's products set up properly in multiple rooms, it's rarer sti...
-
The floorstanding Canalis loudspeakers in the Spiral Groove room, driven by Qualia digital source and amplification, were new to me, bu...
Market information
Blog Archive
-
▼
2013
(510)
-
▼
May
(29)
- Westone 4R In-ear Headphone Sweepstakes
- Maria Schneider’s Winter Morning Walks
- Aidan Baker: On Music, Sound, and Already Drowning
- Roy Gandy: 40 Years of Reganomics
- Recording of June 2013: Already Drowning
- Nordost Premiers the Valhalla 2
- Your Show of Shows: Newport Beach 2013 Starts Friday
- Payday Albums: 5/24/13
- 21 Tracks for Newport Beach: A Playlist
- VTL's Luke Manley
- How Not to Change a Tweeter
- Broken Deer: Polaraura
- Focal XS Book Music System Sweepstakes
- Velodyne DF-661 loudspeaker
- Tony Wins Some Schiit
- Passion of the Hi-Fi: Part VI - Resolution
- Boston Acoustics A40 loudspeaker
- Altec Lansing 301 loudspeaker
- A Unique Attention Screen Recording Concert in NYC...
- Released Today: Anamanaguchi’s Endless Fantasy
- Munich: A Few Of My Favorite Things
- Munich High End 2013
- Audiophile Essentials Packages Now Available
- Javelin Live at Brooklyn Bowl
- M2Tech Young D/A processor & Palmer Power Station ...
- Listening #125
- Passion of the Hi-Fi: Part V – Imbalance
- Remix: UNKWON Does “Love and Respect” by When Sain...
- 2013 Jazz Journalism Awards
-
▼
May
(29)
How Not to Change a Tweeter

Dusty guitar amps, dirt-speckled stage light fixtures, and busted drivers piled atop each other on a series of shelves. I inspected each piece of gear carefully. Atop the highest shelf, I found it. They were covered in scratch marks and gum, but the logo was clear: Polk Audio. The “i" was dotted with a little heart. I fell in love.
I asked to test them out. The soundman stripped one end of a quarter inch cable and plugged it into to the back of one of the speakers. He plugged the terminated end of the quarter inch into the unbalanced output of a powered mixer. Music played. We followed the same procedure with speaker number two. A flask or two of whiskey deep, all I heard was awesome. I brought home a pair of Polk Audio Monitor 7s for $30.
Listening at home, I became aware that one of the speakers’ tweeters was not functioning.
The Polk Audio Monitor 7s sat unused for two years.
I informed Polk Representative Adam Sohmer of my situation. He told me that Polk was going to make me new tweeters for the speakers. Two months later, two small boxes each identified as “Authentic Polk Replacement” arrived at the Stereophile office.
I asked Adam, “Will I have to solder?”
“Yes! Definitely.”
I was excited for this new opportunity. To help me in the process, I invited friend and old band-mate Darrell Dumas to my house. He’s a guitar gear geek who builds his own pedals. He was more than down to teach me how to solder and help me in the speaker reconstruction process.
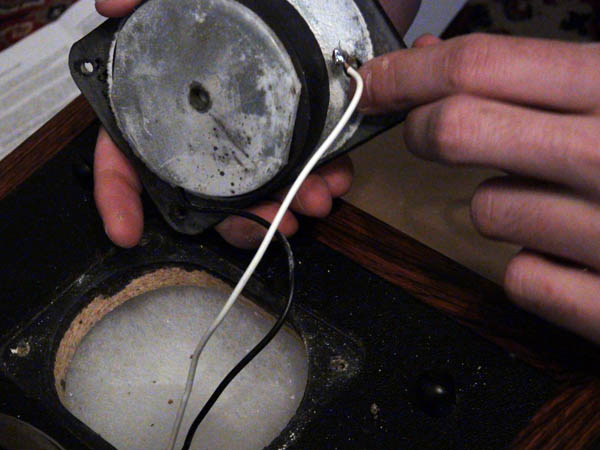
Before Darrell arrived, I removed the tweeter to confirm that we were indeed going to need to solder, and it was not just pushpins like my Usher S-520s. Bulbous metallic bubbles connected the cables coming from inside the speaker to the tweeter. Soldering was required.
Darrell arrived and we put on our safety glasses. Larry the cat watched.

We placed the speaker, back down, on a piece of cardboard in case any melted solder dripped to the ground. Using my brand new Weller WES51 Soldering Iron, we applied the hot iron to a pre-existing joint and melted away the old solder. Following this, we cut off the old wire and stripped off about an inch of insulation.
We thread the exposed wire into the new tweeter’s binding posts. Using a 0.5-ounce container of acid-free Benzomatic rosin core solder, we held the tip of the solder to the destined joint location and touched the iron to the solder. The solder melted over the wire and binding post and created a shiny little orb.
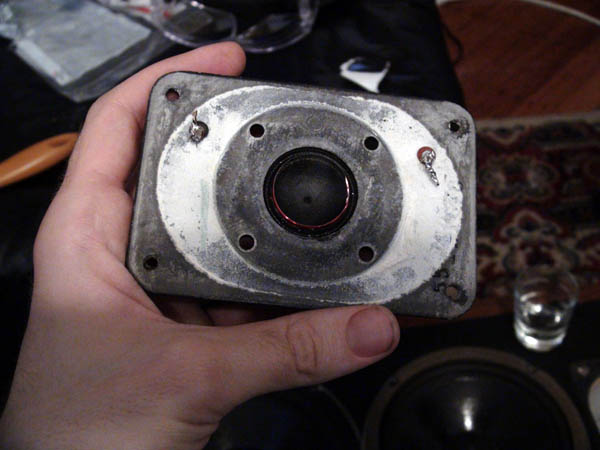
After soldering the first tweeter, we discovered the faceplate of the new tweeter was smaller than the old one. The correct thing to do in this situation would have been:
a) Pause all work.
b) Contact Polk Audio and inform them of the mismatched faceplate size.
c) Tell Darrell to go home.
But that’s not what we did. Instead, we did what most musicians would do: Improvise!
The first idea was to try and exchange the faceplates of the old and new tweeters. While there were four screws on the outer ridge of the faceplate to hold the tweeter to the cabinet, there were also four screws around the tweeter’s dome that seemed to hold the dome and the voice coil to the faceplate. We removed those four screws from the old and new tweeters. Unfortunately, the dome and voice coil of the old tweeter were permanently affixed to the faceplate unlike the dome and voice coil of the new tweeter, which could be separated. This ruined our ingenious plan.


When I showed JA the pictures the following week, he gasped and nearly scolded, “Don’t do that! You’ve killed the tweeter.” Eternally calm, this is the most shaken I’ve ever actually seen JA. What did I do? “You can’t post this!” he commanded.
I asked him, “If there are screws there, then why shouldn’t I be able to unscrew it?” This still seems like a reasonable question.
“Because the tweeter’s dome and voice coil are lined up precisely above the magnet with a jig by a trained assembly-person. The exact centering of the tweeter is required so that it may move in and out of the circular gap between the central polepiece in the correct fashion.”
“Oh.”
“There could also be some ferrofluid in there that you let out.”
“But the tweeter worked!”
“It worked?”
Since we couldn’t combine the old faceplate with the new tweeter dome and voice coil, we devised a surgical procedure. We positioned the faceplate and re-installed tweeter dome and voice coil so at least two of the holes matched up to the cabinet. We drove a nail into the cabinet where the mismatched holes lined up and twisted screws into the newly formed openings. After hooking the speaker up to my amplifier, we played the high frequency test tones from Stereophile’s Editor’s Choice. The tweeter worked! We got lucky.
It was now time to change the tweeter on the speaker that was actually broken. When I opened this speaker, a cloud of white dust emerged. We followed the same procedure: cut the wire, strip the wire, thread the wire, hold solder and iron to joint and melt together. We performed the same nail-through-cabinet surgery and hooked the speaker up to the amp. This time the tweeter did not work. Mind you, this was not the tweeter we had performed our previous disassembly, which could have potentially killed the tweeter. Our soldering the second time around was even more careful than the first.
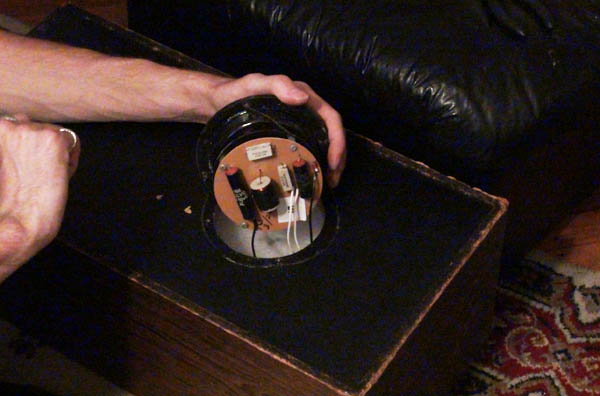
We opened the back of the speaker to see if we could notice something funny in the crossover, but at that point, Darrell and I realized we both had no idea what we were doing. I’ll be taking the speaker to JA’s house for further investigation.

Source : stereophile[dot]com


Comments[ 0 ]
Post a Comment